Basics of IOS XR Software
This article highlights the basics of IOS XR software, with the end goal being the education of an individual who desires to understand and upgrade the software of an IOS XR device. Topics that are covered include software types and states, software package downloading, addition, installation, and commission, turbobooting an IOS XR device, and some common caveats an individual might encounter when upgrading or downgrading the software of an IOS XR device.
Software Types
Cisco IOS XR software is divided into software packages so that you can select which features run on your router. Each package contains the components to perform a specific set of router functions, such as routing, security, or modular services card (MSC) support. Bundles are groups of packages that can be downloaded as a set. For example, Cisco IOS XR Unicast Routing Core Bundle (known as mini) provides the main packages for use on every router.
Software packages are divided into two major groups: PIEs, and SMUs.
PIEs (Packet Installation Envelope) are nonbootable files that contain a single package or a set of packages (called a composite package or bundle). Because the files are nonbootable, they are used to add software package files to a running router. They are distinguishable by the word “pie” within the filename, such as asr9k-fpd-px.pie-5.2.4.
SMUs (Software Maintenance Upgrade) are nonbootable files that contain fixes for a specific defect. Some SMUs fix one specific defect, while others bundle together multiple fixes for multiple defects. SMUs are created to respond to immediate issues and do not include new features. Typically, SMUs do not have a large impact on router operations. SMU versions are synchronized to the package major, minor, and maintenance versions they upgrade. They are easily distinguishable from PIEs by the defect ID included in the filename as well as the .pie file extension, such as in asr9k-invmgr-5.2.4.CSCuz20763.pie.
Put simply, PIEs add functionality to the device, while SMUs fix defects.
Software States
Software packages can have four states: inactive, active, committed, and superceded.
- Inactive indicates that the software package has been added to the device’s repository, but the package is not currently running. Put simply, it is a “staging” point for software packages before they can become active.
- Active indicates that the software package is currently running on the device.
- Committed indicates that the software package will become active if the device reloads.
- Superceded indicates that another software package contains a fix for the same defect as the superceded SMU. The superceded SMU is installed, but no longer necessary and can be removed manually by the user.
It is important to note that software packages can be in both the active state and the committed state at the same time. This indicates that the software package is currently running and will continue to run after a chassis reload. This is demonstrated in the output below.
1
2
3
4
5
6
7
8
9
10
11
12
13
14
15
16
17
18
19
20
21
22
23
24
25
26
27
28
29
30
31
32
33
 RP/0/RSP0/CPU0:ASR9006-PE2#show install summary
 Wed Jan 1 23:41:08.224 UTC
 Default Profile:
 SDRs:
 Owner
 Active Packages:
 disk0:asr9k-services-infra-5.3.4
 disk0:asr9k-9000v-nV-px-5.3.4
 disk0:asr9k-doc-px-5.3.4
 disk0:asr9k-mini-px-5.3.4
 disk0:asr9k-mcast-px-5.3.4
 disk0:asr9k-mpls-px-5.3.4
 disk0:asr9k-services-px-5.3.4
 disk0:asr9k-bng-px-5.3.4
 disk0:asr9k-mgbl-px-5.3.4
 disk0:asr9k-optic-px-5.3.4
 Inactive Packages:
 disk0:asr9k-li-px-5.3.4
 disk0:asr9k-fpd-px-5.3.4
 disk0:asr9k-video-px-5.3.4
 Committed Packages:
 disk0:asr9k-services-infra-5.3.4
 disk0:asr9k-9000v-nV-px-5.3.4
 disk0:asr9k-doc-px-5.3.4
 disk0:asr9k-mini-px-5.3.4
 disk0:asr9k-mcast-px-5.3.4
 disk0:asr9k-mpls-px-5.3.4
 disk0:asr9k-services-px-5.3.4
 disk0:asr9k-bng-px-5.3.4
 disk0:asr9k-mgbl-px-5.3.4
 disk0:asr9k-optic-px-5.3.4
 Superceded Packages:
 No packages.
It might be helpful to think of the active state like a device’s running-configuration, while the committed state is a device’s startup-configuration, except the states refer to software packages instead of configuration.
All active software packages must be of the same version of code. Software packages cannot be mixed between different versions of code. For example, you cannot activate a SMU for 6.1.4 when your active PIEs are for 5.3.4.
Software Package Activation, Deactivation, and Committing
Software Package Identification
Before modifying any software packages on an IOS XR device, you should verify that all hardware is in a stable, working state. This can be verified with the admin show platform command. Stable devices are dictated with a state of IOS XR RUN, READY, or OK.
The first step to changing IOS XR software packages is to determine what software packages are currently active on the device. This can be easily done with the show install active summary command, as shown below:
1
2
3
4
5
6
7
8
9
10
11
12
13
14
15
16
 RP/0/RSP0/CPU0:ASR9006-PE2#show install active summary
 Wed Jan 1 23:58:16.494 UTC
 Default Profile:
 SDRs:
 Owner
 Active Packages:
 disk0:asr9k-services-infra-5.3.4
 disk0:asr9k-9000v-nV-px-5.3.4
 disk0:asr9k-doc-px-5.3.4
 disk0:asr9k-mini-px-5.3.4
 disk0:asr9k-mcast-px-5.3.4
 disk0:asr9k-mpls-px-5.3.4
 disk0:asr9k-services-px-5.3.4
 disk0:asr9k-bng-px-5.3.4
 disk0:asr9k-mgbl-px-5.3.4
 disk0:asr9k-optic-px-5.3.4
In the above output, our device is running 5.3.4 PIEs, and no SMUs. We will need to download the same PIE files for the 6.0.2 version of code in order to upgrade this box to 6.0.2.
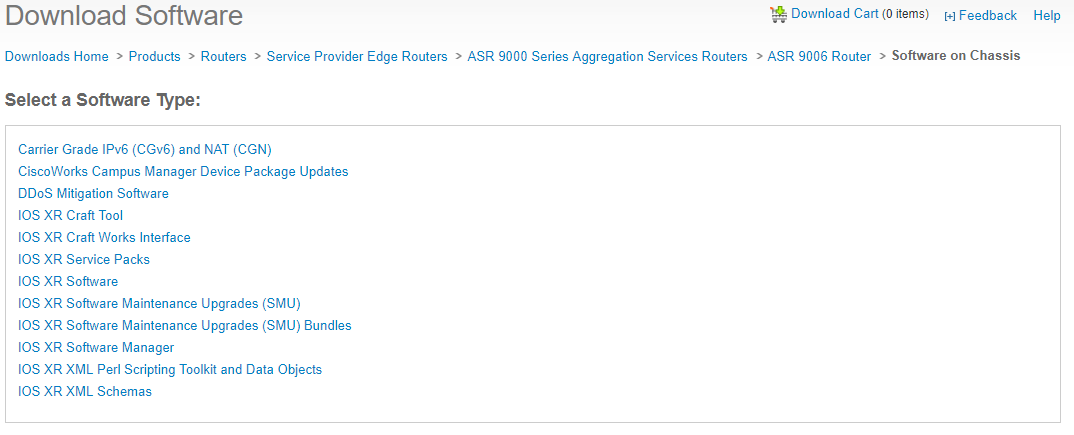
On CCO, PIEs and SMUs are segregated under different software types, as shown below. PIEs can be located under IOS XR Software, while SMUs are located under either “IOS XR Software Maintenance Upgrades (SMU)” or “IOS XR Software Maintenance Upgrades (SMU) Bundles”, depending on the specific SMU.
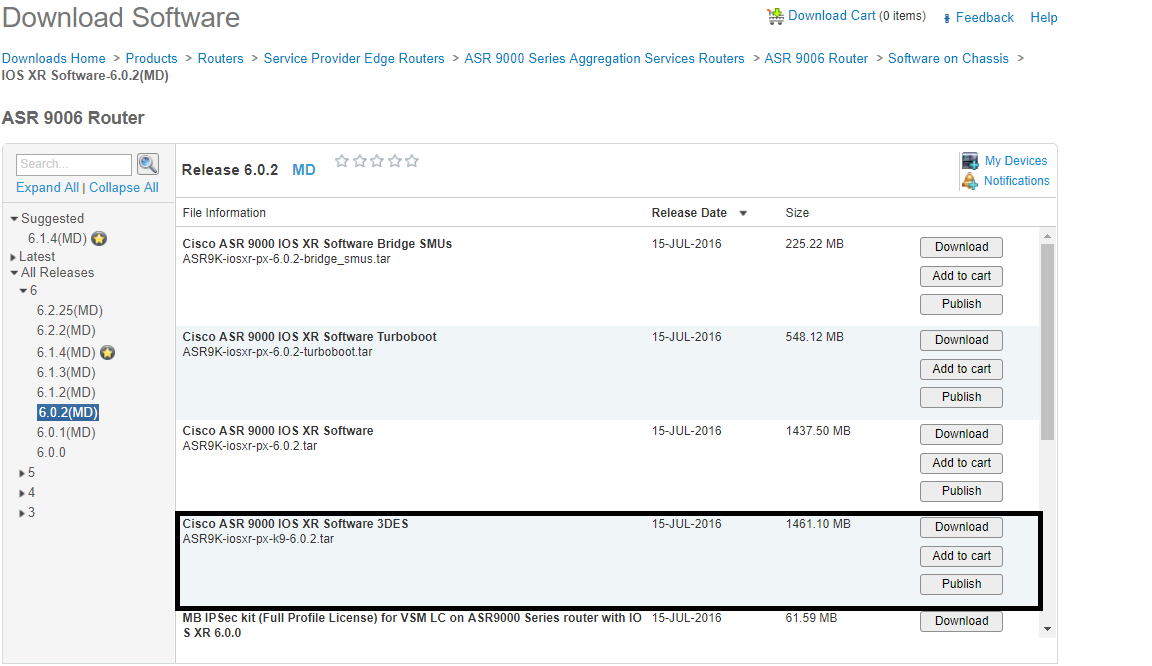
PIE files cannot be downloaded individually – instead, all of the possible PIE files for a version of code are bundled together in a tar file. This is shown in the screenshot below, with the appropriate tar file that we need to download marked:
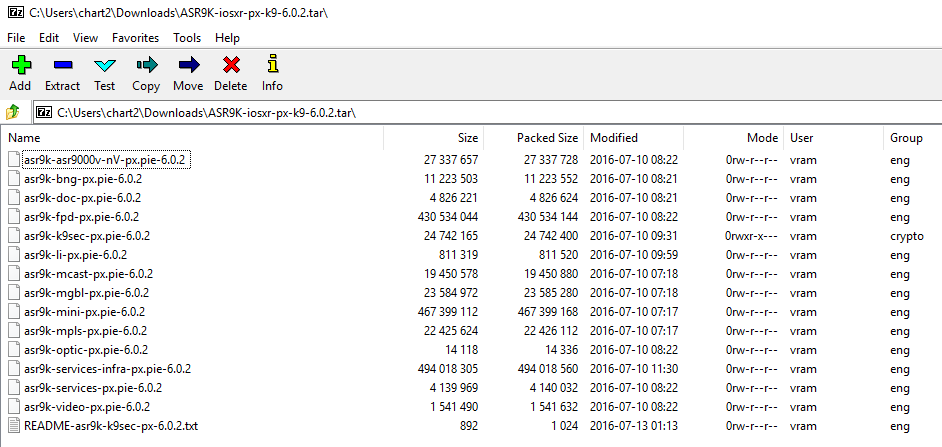
Within this tar file, we can see each individual PIE file as shown below.
From here, there are two different paths that can be taken. The first option is to extract each individual necessary PIE file from the tar, upload each one to an FTP server, and add each PIE file as an inactive software package individually. The second option is to extract each individual necessary PIE file from the tar, create a new tar containing the PIE files you need, uploading the custom tar file to the FTP server, and adding the contents of the custom tar file to the device as inactive software packages. Both options are explored in detail further below.
Before we move forward, take note that the “mini-px.vm” PIE file is not a normal software package. It is a VM image that is used to turboboot the chassis for the purposes of disaster recovery. Do not attempt to install or activate the “mini-px.vm” file as a normal software package.
Adding Software Packages Individually
We can extract the individual PIE files needed in order to upgrade our device to 6.0.2, then upload them to an FTP server so that we can transfer them to the device. The specific PIE files needed to upgrade our device are as follows:
1
2
3
4
5
6
7
8
9
10
 disk0:asr9k-services-infra-6.0.2
 disk0:asr9k-9000v-nV-px-6.0.2
 disk0:asr9k-doc-px-6.0.2
 disk0:asr9k-mini-px-6.0.2
 disk0:asr9k-mcast-px-6.0.2
 disk0:asr9k-mpls-px-6.0.2
 disk0:asr9k-services-px-6.0.2
 disk0:asr9k-bng-px-6.0.2
 disk0:asr9k-mgbl-px-6.0.2
 disk0:asr9k-optic-px-6.0.2
Next, from our device, we need to add each of the desired PIE files to our repository so that they appear in show install active summary as inactive software packages. We can do this with the admin install add source ftp://username:password@ftp-server/subdirectory pie-file command, demonstrated below.
1
2
3
4
5
RP/0/RSP0/CPU0:ASR9006-PE2#admin install add source ftp://username:[email protected]/XR-602-temp asr9k-mini-px.pie-6.0.2 asr9k-services-px.pie-6.0.2 asr9k-services-infra-px.pie-6.0.2 asr9k-optic-px.pie-6.0.2 asr9k-doc-px.pie-6.0.2 asr9k-bng-px.pie-6.0.2 asr9k-fpd-px.pie-6.0.2 asr9k-mpls-px.pie-6.0.2$
 Wed Jan 1 09:47:30.157 UTC
 Install operation 888 '(admin) install add source /ftp://username:********@192.0.2.10/XR-602-temp/ asr9k-mini-px.pie-6.0.2 asr9k-services-px.pie-6.0.2 asr9k-services-infra-px.pie-6.0.2 asr9k-optic-px.pie-6.0.2 asr9k-doc-px.pie-6.0.2 asr9k-bng-px.pie-6.0.2 asr9k-fpd-px.pie-6.0.2 asr9k-mpls-px.pie-6.0.2
 asr9k-mcast-px.pie-6.0.2 asr9k-mgbl-px.pie-6.0.2 asr9k-k9sec-px.pie-6.0.2 asr9k-asr9000v-nV-px.pie-6.0.2' started by user 'admin' via CLI at 09:47:30 UTC Wed Jan 01 2014.
 The install operation will continue asynchronously.
By default, most admin install commands will perform asynchronously in the background. If you’d like to actively monitor the progress of a command, you can add the synchronous keyword afterwards. Otherwise, you can monitor the progress of an asynchronous command with the show install request command.
Adding Software Packages In A Tar
We can extract the individual PIE files needed in order to upgrade our device to 6.0.2, then upload them to an FTP server so that we can transfer them to the device. The specific PIE files needed to upgrade our device are as follows:
1
2
3
4
5
6
7
8
9
10
 disk0:asr9k-services-infra-6.0.2
 disk0:asr9k-9000v-nV-px-6.0.2
 disk0:asr9k-doc-px-6.0.2
 disk0:asr9k-mini-px-6.0.2
 disk0:asr9k-mcast-px-6.0.2
 disk0:asr9k-mpls-px-6.0.2
 disk0:asr9k-services-px-6.0.2
 disk0:asr9k-bng-px-6.0.2
 disk0:asr9k-mgbl-px-6.0.2
 disk0:asr9k-optic-px-6.0.2
Next, from our device, we need to add each of the desired PIE files to our repository so that they appear in show install active summary as inactive software packages. We can do this with the admin install add source ftp://username:password@ftp-server/subdirectory pie-file command, demonstrated below.
1
2
3
4
5
RP/0/RSP0/CPU0:ASR9006-PE2#admin install add source ftp://username:[email protected]/XR-602-temp asr9k-mini-px.pie-6.0.2 asr9k-services-px.pie-6.0.2 asr9k-services-infra-px.pie-6.0.2 asr9k-optic-px.pie-6.0.2 asr9k-doc-px.pie-6.0.2 asr9k-bng-px.pie-6.0.2 asr9k-fpd-px.pie-6.0.2 asr9k-mpls-px.pie-6.0.2$
 Wed Jan 1 09:47:30.157 UTC
 Install operation 888 '(admin) install add source /ftp://username:********@192.0.2.10/XR-602-temp/ asr9k-mini-px.pie-6.0.2 asr9k-services-px.pie-6.0.2 asr9k-services-infra-px.pie-6.0.2 asr9k-optic-px.pie-6.0.2 asr9k-doc-px.pie-6.0.2 asr9k-bng-px.pie-6.0.2 asr9k-fpd-px.pie-6.0.2 asr9k-mpls-px.pie-6.0.2
 asr9k-mcast-px.pie-6.0.2 asr9k-mgbl-px.pie-6.0.2 asr9k-k9sec-px.pie-6.0.2 asr9k-asr9000v-nV-px.pie-6.0.2' started by user 'admin' via CLI at 09:47:30 UTC Wed Jan 01 2014.
 The install operation will continue asynchronously.
By default, most admin install commands will perform asynchronously in the background. If you’d like to actively monitor the progress of a command, you can add the synchronous keyword afterwards. Otherwise, you can monitor the progress of an asynchronous command with the show install request command.
Activating Software Packages
Once software packages have been added to the device’s repository and appear as inactive packages when the show install summary command is run, the device can be upgraded to a new version of software by activating the respective packages. The command to do so is admin install activate disk0:package.pie. This command allows for any number of software packages to be activated by enumerating them within the command, as shown below.
1
2
3
4
5
6
7
8
9
10
11
RP/0/RSP0/CPU0:ios#admin install activate disk0:asr9k-services-infra-6.0.2 disk0:asr9k-services-px-6.0.2 disk0:asr9k-mini-px-6.0.2 disk0:asr9k-optic-px-6.0.2 disk0:asr9k-doc-px-6.0.2 disk0:asr9k-bng-px-6.0.2 disk0:asr9k-fpd-px-6.0.2 disk0:asr9k-mpls-px-6.0.2 disk0:asr9k-mcast-px-6.0.2 disk0:asr9k-mgbl-px-6.0.2 disk0:asr9k-k9sec-px-6.0.2 disk0:asr9k-9000v-nV-px-6.0.2
 Thu Jan 2 05:03:52.319 UTC
 RP/0/RSP0/CPU0:Jan 2 05:03:52.453 : instdir[251]: %INSTALL-INSTMGR-6-INSTALL_OPERATION_STARTED : Install operation 917 '(admin) install activate disk0:asr9k-services-infra-6.0.2 disk0:asr9k-services-px-6.0.2 disk0:asr9k-mini-px-6.0.2 disk0:asr9k-optic-px-6.0.2 disk0:asr9k-doc-px-6.0.2 disk0:asr9k-bng-px-6.0.2 disk0:asr9k-fpd-px-6.0.2 disk0:asr9k-mpls-px-6.0.2 disk0:asr9k-mcast-px-6.0.2 Install operation 917 '(admin) install activate disk0:asr9k-services-infra-6.0.2disk0:asr9k-mgbl-px-6.0.2 disk0:asr9k-k9sec-px-6.0.2 disk0:asr9k-9000v-nV-px-...' started by user 'admin'
 disk0:asr9k-services-px-6.0.2 disk0:asr9k-mini-px-6.0.2 disk0:asr9k-optic-px-6.0.2 disk0:asr9k-doc-px-6.0.2 disk0:asr9k-bng-px-6.0.2 disk0:asr9k-fpd-px-6.0.2 disk0:asr9k-mpls-px-6.0.2 disk0:asr9k-mcast-px-6.0.2 disk0:asr9k-mgbl-px-6.0.2 disk0:asr9k-k9sec-px-6.0.2 disk0:asr9k-9000v-nV-px-6.0.2' started by user 'admin' via CLI at 05:03:52 UTC Thu Jan 02 2014.
 Info: This operation will reload the following nodes in parallel:
 Info: 0/RSP0/CPU0 (RP) (SDR: Owner)
 Info: 0/RSP1/CPU0 (RP) (SDR: Owner)
 Info: 0/0/CPU0 (LC) (SDR: Owner)
 Proceed with this install operation (y/n)? [y]
 Info: Install Method: Parallel Reload
 The install operation will continue asynchronously.
When changing the software version of the chassis, the chassis will reload once the new version of software packages have been activated. If you are adding a software package to a chassis, but not changing the software version, then the chassis will not typically reload.
If you have added a large number of software packages to a device’s repository, IOS XR conveniently allows you to perform actions on all of them at once by referring to the install operation ID, which is given to you in the output following an admin install add command. An example of this is shown below, with the install operation ID bolded.
1
2
3
4
RP/0/RSP0/CPU0:ios#admin install add source ftp://username:[email protected] asr9k-mini-px.pie-6.0.2 asr9k-services-px.pie-6.0.2 asr9k-services-infra-px.pie-6.0.2 asr9k-optic-px.pie-6.0.2 asr9k-doc-px.pie-6.0.2 asr9k-bng-px.pie-6.0.2 asr9k-fpd-px.pie-6.0.2 asr9k-mpls-px.pie-6.0.2 asr9k-mcast-px.pie-6.0.2 asr9k-mgbl-px.pie-6.0.2 asr9k-k9sec-px.pie-6.0.2 asr9k-asr9000v-nV-px.pie-6.0.2
 Thu Jan 2 04:37:48.487 UTC
 Install operation 916 '(admin) install add source /ftp://username:********@192.0.2.10/ asr9k-mini-px.pie-6.0.2 asr9k-services-px.pie-6.0.2 asr9k-services-infra-px.pie-6.0.2 asr9k-optic-px.pie-6.0.2 asr9k-doc-px.pie-6.0.2 asr9k-bng-px.pie-6.0.2 asr9k-fpd-px.pie-6.0.2 asr9k-mpls-px.pie-6.0.2 asr9k-mcast-px.pie-6.0.2 asr9k-mgbl-px.pie-6.0.2 asr9k-k9sec-px.pie-6.0.2 asr9k-asr9000v-nV-px.pie-6.0.2' started by user 'admin' via CLI at 04:37:48 UTC Thu Jan 02 2014.
 The install operation will continue asynchronously.
The command to activate all of the software packages included in an install operation ID is admin install activate id XXX, where XXX is the install operation ID given to you by the output of an admin install add command. An example of this is shown below.
1
2
3
4
5
6
7
8
9
10
11
12
13
14
15
16
17
18
19
20
21
22
23
24
25
26
27
28
29
30
31
32
33
34
35
36
37
38
39
40
41
RP/0/RSP0/CPU0:ios#admin install add source ftp://username:[email protected] asr9k-m$
 Wed Jan 29 22:17:56.249 UTC
 Install operation 484 '(admin) install add source /ftp://username:********@192.0.2.10/
 asr9k-mini-px.pie-6.0.2 asr9k-fpd-px.pie-6.0.2 asr9k-mpls-px.pie-6.0.2
 asr9k-mcast-px.pie-6.0.2 asr9k-mgbl-px.pie-6.0.2 asr9k-k9sec-px.pie-6.0.2
 asr9k-asr9000v-nV-px.pie-6.0.2' started by user 'admin' via CLI at 22:17:56 UTC
 Wed Jan 29 2014.
 The install operation will continue asynchronously.
 RP/0/RSP0/CPU0:ios#Info: The following packages are now available to be activated:
 Info:
 Info: disk0:asr9k-mini-px-6.0.2
 Info: disk0:asr9k-fpd-px-6.0.2
 Info: disk0:asr9k-mpls-px-6.0.2
 Info: disk0:asr9k-mcast-px-6.0.2
 Info: disk0:asr9k-mgbl-px-6.0.2
 Info: disk0:asr9k-k9sec-px-6.0.2
 Info: disk0:asr9k-9000v-nV-px-6.0.2
 Info:
 Info: The packages can be activated across the entire router.
 Info:
 Install operation 484 completed successfully at 22:26:29 UTC Wed Jan 29 2014.

RP/0/RSP0/CPU0:ios#admin install activate id 484
 Wed Jan 29 22:27:09.668 UTC
 Install operation 485 '(admin) install activate id 484' started by user 'admin'
 via CLI at 22:27:09 UTC Wed Jan 29 2014.
 Info: This operation will activate the following packages:
 Info: disk0:asr9k-9000v-nV-px-6.0.2
 Info: disk0:asr9k-k9sec-px-6.0.2
 Info: disk0:asr9k-mgbl-px-6.0.2
 Info: disk0:asr9k-mcast-px-6.0.2
 Info: disk0:asr9k-mpls-px-6.0.2
 Info: disk0:asr9k-fpd-px-6.0.2
 Info: disk0:asr9k-mini-px-6.0.2
 Info: This operation will reload the following nodes in parallel:
 Info: 0/RSP0/CPU0 (RP) (SDR: Owner)
 Info: 0/RSP1/CPU0 (RP) (SDR: Owner)
 Info: 0/0/CPU0 (LC) (SDR: Owner)
 Proceed with this install operation (y/n)? [y]
 Info: Install Method: Parallel Reload
 The install operation will continue asynchronously.
When activating PIEs to upgrade or downgrade a device’s software version, all activated PIEs must be replaced with their new versions simultaneously. The admin install activate command allows for the user to select multiple PIEs to facilitate this process.
PIE versions that are being replaced are automatically deactivated when the new PIE is activated. For example, when upgrading asr9k-fpd-px.pie-5.3.4 to asr9k-fpd-px.pie-6.0.2, asr9k-fpd-px.pie-5.3.4 is automatically deactivated when the admin install activate disk0:asr9k-fpd-px.pie-6.0.2 command is executed. This only happens with PIEs; activating a SMU does not cause previous versions of the SMUs, or the package to which the SMU applies, to be automatically deactivated.
Deactivating Software Packages
Software packages can be manually deactivated to remove unnecessary functionality or bugfixes from the device. To do this, verify that the software package is currently active by ensuring it shows up under Active Packages in the output of show install active summary. Next, deactivate the software package with the admin install deactivate disk0:package.pie command, demonstrated below.
1
2
3
4
5
6
7
8
9
10
11
12
13
14
15
16
17
18
19
20
21
22
23
24
25
26
27
28
29
30
31
32
33
34
35
RP/0/RSP0/CPU0:ios#admin install deactivate disk0:asr9k-services-infra-6.1.2 disk0:asr9k-video-px-6.1.2 disk0:asr9k-services-px-6.1.2 disk0:asr9k-optic-px-6.1.2 disk0:asr9k-li-px-6.1.2 disk0:asr9k-doc-px-6.1.2 disk0:asr9k-bng-px-6.1.2
 Mon Nov 17 04:31:58.831 UTC
 Install operation 538 '(admin) install deactivate disk0:asr9k-services-infra-6.1.2 disk0:asr9k-video-px-6.1.2 disk0:asr9k-services-px-6.1.2 disk0:asr9k-optic-px-6.1.2 disk0:asr9k-li-px-6.1.2 disk0:asr9k-doc-px-6.1.2 disk0:asr9k-bng-px-6.1.2' started by user 'admin' via CLI at 04:31:59 UTC Mon Nov
 17 2014.
 Info: The following sequence of sub-operations has been determined to minimize any impact:
 Info:
 Info: Sub-operation 1:
 Info: Install Method: Parallel Process Restart
 Info: asr9k-services-infra-6.1.2
 Info:
 Info: Sub-operation 2:
 Info: Install Method: Parallel Process Restart
 Info: asr9k-li-px-6.1.2
 Info:
 Info: Sub-operation 3:
 Info: Install Method: Parallel Process Restart
 Info: asr9k-services-px-6.1.2
 Info:
 Info: Sub-operation 4:
 Info: Install Method: Parallel Process Restart
 Info: asr9k-video-px-6.1.2
 Info:
 Info: Sub-operation 5:
 Info: Install Method: Parallel Process Restart
 Info: asr9k-optic-px-6.1.2
 Info:
 Info: Sub-operation 6:
 Info: Install Method: Parallel Process Restart
 Info: asr9k-doc-px-6.1.2
 Info:
 Info: Sub-operation 7:
 Info: Install Method: Parallel Process Restart
 Info: asr9k-bng-px-6.1.2
 Info:
 The install operation will continue asynchronously.
Committing Software Packages
When a software package is activated, it is best practice to commit the change to the chassis so that the software package activation persists after a chassis reload. This is done by running the admin install commit command after the desired software packages have been activated and the chassis has reloaded. This is demonstrated below.
1
2
3
4
5
6
7
8
9
 RP/0/RSP0/CPU0:Nov 17 04:45:25.825 : instdir[255]: %INSTALL-INSTMGR-4-ACTIVE_SOFTWARE_COMMITTED_INFO : The currently active software is not committed. If the system reboots then the committed software will be used. Use 'install commit' to commit the active software.
 Install operation 538 completed successfully at 04:45:25 UTC Mon Nov 17 2014.

RP/0/RSP0/CPU0:ios#admin install commit
 Mon Nov 17 04:51:57.625 UTC
 Install operation 539 '(admin) install commit' started by user 'admin' via CLI at 04:51:58 UTC Mon Nov 17 2014.
 | 100% complete: The operation can no longer be aborted (ctrl-c for options)
 RP/0/RSP0/CPU0:Nov 17 04:52:06.522 : instdir[255]: %INSTALL-INSTMGR-4-ACTIVE_SOFTWARE_COMMITTED_INFO : The currently active software is now the same as the committed software.
 Install operation 539 completed successfully at 04:52:06 UTC Mon Nov 17 2014.
If you do not commit the software changes to the chassis, then a chassis reload will cause the chassis to revert to the previously-committed activated software packages. For example, if active software packages are upgraded from 5.3.4 to 6.1.4, but the admin install commit command is not run after the chassis reloads due to the upgrade, a subsequent chassis reload will result in the device reverting to 5.3.4 versions of the active software packages.
Turbobooting
Turbobooting is a highly-disruptive disaster recovery procedure that provides a clean software installation on an IOS XR device. Turbobooting is only performed by modifying the configuration register of the device such that it boots into ROMMON, reloading the chassis, setting variables within ROMMON, and booting from the mini-vm image matching the desired software version via TFTP.
Keep in mind that turbobooting is a time-intensive method of modifying a device’s IOS XR software version and should only be used as a last resort.
Turbobooting can be performed on a device with a single RSP or dual RSPs. If a device has dual RSPs, only a single RSP needs to be turbobooted. The process below will assume that the IOS XR device being turbobooted has multiple RSPs.
First, verify that the mini-vm image matching the desired software version is uploaded to an FTP server that is reachable by the XR device. An example of the filename for the mini-vm image is asr9k-mini-px.vm-5.3.4, where the software version at the end of the filename matches the software version you desire the chassis to be running after the turbobooting process is complete.
Next, modify the configuration register of the device’s RSPs to 0x0 using the admin config-register 0x0 command, as demonstrated below. This will cause all RSPs to drop into ROMMON when reloaded.
1
2
3
4
RP/0/RSP0/CPU0:ios#admin config-register 0x0
 Sat Nov 18 02:47:31.597 UTC
 Successfully set config-register to 0x0 on node 0/RSP0/CPU0
 Successfully set config-register to 0x0 on node 0/RSP1/CPU0
Next, reload both RSPs using the reload location all command. The RSPs will be in ROMMON after reloading.
1
2
3
4
5
6
7
8
9
RP/0/RSP0/CPU0:ios#admin reload location all
 Sat Nov 18 02:51:58.151 UTC

Preparing system for backup. This may take a few minutes especially for large configurations.
 Status report: node0_RSP0_CPU0: START TO BACKUP
 Status report: node0_RSP0_CPU0: BACKUP HAS COMPLETED SUCCESSFULLY
 [Done]
 Proceed with reload? [confirm]
 RP/0/RSP0/CPU0::This node received reload command. Reloading in 5 secs
All RSPs will reboot with a ROMMON prompt.
1
2
3
4
5
6
7
8
9
10
11
12
13
14
15
16
 System Bootstrap, Version 0.76 [ASR9K x86 ROMMON],
 Copyright (c) 1994-2012 by Cisco Systems, Inc.
 Compiled on Mon 05/23/2016 20:19:29.12 by myekkar

Rommon : 0.76
 Ibex Peak : 6
 Jasper Forest: 1.0
 Zen-JF : 0.7.92
 CBC0 : Part 1=16.116, Part 2=16.115, Act Part=1
 Laguna : 0.11.0 (primary)
 Dao : 1.10.0 (primary)
 UTI : 4.9 (primary)
 Timex : 0.1.1 (primary)
 Board : 4
 ==========================================================
 rommon 1 >
Next, set ROMMON variables on one of the RSPs to match your environment as follows:
- IP_ADDRESS – The IP address of your RSP’s management port.
- IP_SUBNET_MASK – The subnet mask of the RSP’s management port.
- DEFAULT_GATEWAY – The default gateway of the RSP’s management port.
- TFTP_SERVER – The IP address of the TFTP server containing your mini-vm turboboot image.
- TURBOBOOT – Set this to “on,disk0,clean” to enable turbobooting and completely clean the disk0: storage device.
Unset the BOOT statement using the unset BOOT command, then sync all changed boot variables using the sync command. Lastly, boot the mini-vm turboboot image using the boot tftp://tftp_ip_address/turboboot_image command.
These steps are demonstrated below:
1
2
3
4
5
6
7
8
 rommon 4 > IP_ADDRESS=192.0.2.25
 rommon 5 > IP_SUBNET_MASK=255.255.255.0
 rommon 6 > DEFAULT_GATEWAY=192.0.2.1
 rommon 7 > TFTP_SERVER=192.0.2.10
 rommon 8 > TURBOBOOT=on,disk0,clean
 rommon 9 > unset BOOT
 rommon 10 > sync
 rommon 11 > boot tftp://192.0.2.10/asr9k-mini-px.vm-6.0.2
The RSP will proceed to turboboot into the specified software version.
1
2
3
4
5
6
7
8
9
10
11
12
13
14
15
16
17
18
19
20
21
Beginning TFTP boot:
 TFTP server specified is:
 TFTP filename specified is: asr9k-mini-px.vm-6.0.2
 Selecting MGMT LAN 0 interface.

IP_ADDRESS: 192.0.2.25
 IP_SUBNET_MASK: 255.255.255.0
 DEFAULT_GATEWAY: 192.0.2.1
 TFTP_SERVER: 192.0.2.10
 TFTP_FILE: asr9k-mini-px.vm-6.0.2
 TFTP_MACADDR: 84:78:ac:75:1a:58
 TFTP_VERBOSE: Progress
 TFTP_RETRY_COUNT: 18
 TFTP_TIMEOUT: 7200
 TFTP_CHECKSUM: Yes
 ETHER_PORT: 3
 ETHER_SPEED_MODE: Auto Detect
 TFTP attempt 1 of 1
 GigE link up, waiting for ARP reply ...
 Receiving asr9k-mini-px.vm-6.0.2 from 192.0.2.10 !!!!!!!!!!!!!!!!!!!!!!!!!!!!!!!!!!!!!!!!!!!!!!!!!!!!!!!!!!!!!!!!!!!!!!!!!!!!!!!!!!!!!!!!!!!!!!!!!!!!!!!!!!!!!!!!!!!!!!!!!!!!!!!!!!!!!!!!!!!!!!!!!!!!!!!!!!!!!!!!!!!!!!!!!!!!!!!!!!!!!!!!!!!!!!!!!!!!!!!!!!!!!!!!!!!!!!!!!!!!!!!!!!!!!!!!!!!!!!!!!!!!!!!!!!!!!!!!!!!!!!!!!!!!!!!!!!!!!!!!!!!!!!!!!!!!!!!!!!!!!!!!!!!!!!!!!!!!!!!!!!!!!!!!!!!!!!!!!!!!!!!!!!!!!!!!!!!!!!!!!!!!!!!!!!!!!!!!!!!!!!!!!!!!!!!!!!!!!!!!!!!!!!!!!!!!!!!!!!!!!!!!!!!!!!!!!!!!!!!!!!!!!!!!!!!!!!!!!!!!!!!!!!!!!!!!!!!!!!!!!!!!!!!!!!!!!!!!!!!!!!!!!!!!!!!!!!!!!!!!!!!!!!!!!!!!!!!!!!!!!!!!!!!!!!!!!!!!!!!!!!!!!!!!!!!!!!!!!!!!!!!!!!!!!!!!!!!!!!!!!!!!!!!!!!!!!!!!!!!!!!!!!!!!!!!!!!!!!!!!!!!!!!!!!!!!!!!!!!!!!!!!!!!!!!!!!!!!!!!!!!!!!!!!!!!!!!!!!!!!!!!!!!!!!!!!!!!!!!!!!!!!!!!!!!!!!!!!!!!!!!!!!!!!!!!!!!!!!!!!!!!!!!!!!!!!!!!!!!!!!!!!!!!!!!!!!!!!!!!!!!!!!!!!!!!!!!!!!!!!!!!!!!!!!!!!!!!!!!!!!!!!!!!!!!!!!!!!!!!!!!!!!!!!!!!!!!!!!!!!!!!!!!!!!!!!!!!!!!!!!!!!!!!!!!!!!!!!!!!!!!!!!!!!!!!!!!!!!!!!!!!!!!!!!!!!!!!!!!!!!!!!!!!!!!!!!!!!!!!!!!!!!!!!!!!!!!!!!!!!!!!!!!!!!!!!!!!!!!!!!!!!!!!!!!!!!!!!!!!!!!!!!!!!!!!!!!!!!!!!!!!!!!!!!!!!!!!!!!!!!!!!!!!!!!!!!!!!!!!!!!!!!!!!!!!!!!!!!!!!!!!!!!!!!!!!!!!!!!!!!!!!!!!!!!!!!!!!!!!!!!!!!!!!!!!!!!!!!!!!!!!!!!!!!!!!!!!!!!!!!!!!!!!!!!!!!!!!!!!!!!!!!!!!!!!!!!!!!!!!!!!!!!!!!!!!!!!!!!!!!!!!!!!!!!!!!!!!!!!!!!!!!!!!!!!!!!!!!!!!!!!!!!!!!!!!!!!!!!!!!!!!!!!!!!!!!!!!!!!!!!!!!!!!!!!!!!!!!!!!!!!!!!!!!!!!!!!!!!!!!!!!!!!!!!!!!!!!!!!!!!!!!!!!!!!!!!!!!!!!!!!!!!!!!!!!!!!!!!!!!!!!!!!!!!!!!!!!!!!!!!!!!!!!!!!!!!!!!!!!!!!!!!!!!!!!!!!!!!!!!!!!!!!!!!!!!!!!!!!!!!!!!!!!!!!!!!!!!!!!!!!!!!!!!!!!!!!!!!!!!!!!!!!!!!!!!!!!!!!!!!!!!!!!!!!!!!!!!!!!!!!!!!!!!!!!!!!!!!!!!!!!!!!!!!!!!!!!!!!!!!!!!!!!!!!!!!!!!!!!!!!!!!!!!!!!!!!!!!!!!!!!!!!!!!!!!!!!!!!!!!!!!!!!!!!!!!!!!!!!!!!!!!!!!!!!!!!!!!!!!!!!!!!!!!!!!!!!!!!!!!!!!!!!!!!!!!!!!!!!!!!!!!!!!!!!!!!!!!!!!!!!!!!!!!!!!!!!!!!!!!!!!!!!!!!!!!!!!!!!!!!!!!!!!!!!!!!!!!!!!!!!!!!!!!!!!!!!!!!!!!!!!!!!!!!!!!!!!!!!!!!!!!!!!!!!!!!!!!!!!!!!!!!!!!!!!!!!!!!!!!!!!!!!!!!!!!!!!!!!!!!!!!!!!!!!!!!!!!!!!!!!!!!!!!!!!!!!!!!!!!!!!!!!!!!!!!!!!!!!!!!!!!!!!!!!!!!!!!!!!!!!!!!!!!!!!!!!!!!!!!!!!!!!!!!!!!!!!!!!!!!!!!!!!!!!!!!!!!!!!!!!!!!!!!!!!!!!!!!!!!!!!!!!!!!!!!!!!!!!!!!!!!!!!!!!!!!!!!!!!!!!!!!!!!!!!!!!!!!!!!!!!!!!!!!!!!!!!!!!!!!!!!!!!!!!!!!!!!!!!!!!!!!!!!!!!!!!!!!!!!!!!!!!!!!!!!!!!!!!!!!!!!!!!!!!!!!!!!!!!!!!!!!!!!!!!!!!!!!!!!!!!!!!!!!!!!!!!!!!!!!!!!!!!!!!!!!!!!!!!!!!!!!!!!!!!!!!!!!!!!!!!!!!!!!!!!!!!!!!!!!!!!!!!!!!!!!!!!!!!!!!!!!!!!!!!!!!!!!!!!!!!!!!!!!!!!!!!!!!!!!!!!!!!!!!!!!!!!!!!!!!!!!!!!!!!!!!!!!!!!!!!!!!!!!!!!!!!!!!!!!!!!!!!!!!!!!!!!!!!!!!!!!!!!!!!!!!!!!!!!!!!!!!!!!!!!!!!!!!!!!!!!!!!!!!!!!!!!!!!!!!!!!!!!!!!!!!!!!!!!!!!!!!!!!!!!!!!!!!!!!!!!!!!!!!!!!!!!!!!!!!!!!!!!!!!!!!!!!!!!!!!!!!!!!!!!!!!!!!!!!!!!!!!!!!!!!!!!!!!!!!!!!!!!!!!!!!!!!!!!!!!!!!!!!!!!!!!!!!!!!!!!!!!!!!!!!!!!!!!!!!!!!!!!!!!!!!!!!!!!!!!!!!!!!!!!!!!!!!!!!!!!!!!!!!!!!!!!!!!!!!!!!!!!!!!!!!!!!!!!!!!!!!!!!!!!!!!!!!!!!!!!!!!!!!!!!!!!!!!!!!!!!!!!!!!!!!!!!!!!!!!!!!!!!!!!!!!!!!!!!!!!!!!!!!!!!!!!!!!!!!!!!!!!!!!!!!!!!!!!!!!!!!!!!!!!!!!!!!!!!!!!!!!!!!!!!!!!!!!!!!!!!!!!!!!!!!!!!!!!!!!!!!!!!!!!!!!!!!!!!!!!!!!!!!!!!!!!!!!!!!!!!!!!!!!!!!!!!!!!!!!!!!!!!!!!!!!!!!!!!!!!!!!!!!!!!!!!!!!!!!!!!!!!!!!!!!!!!!!!!!!!!!!!!!!!!!!!!!!!!!!!!!!!!!!!!!!!!!!!!!!!!!!!!!!!!!!!!!!!!!!!!!!!!!!!!!!!!!!!!!!!!!!!!!!!!!!!!!!!!!!!!!!!!!!!!!!!!!!!!!!!!!!!!!!!!!!!!!!!!!!!!!!!!!!!!!!!!!!!!!!!!!!!!!!!!!!!!!!!!!!!!!!!!!!!!!!!!!!!!!!!!!!!!!!!!!!!!!!!!!!!!!!!!!!!!!!!!!!!!!!!!!!!!!!!!!!!!!!!!!!!!!!!!!!!!!!!!!!!!!!!!!!!!!!!!!!!!!!!!!!!!!!!!!!!!!!!!!!!!!!!!!!!!!!!!!!!!!!!!!!!!!!!!!!!!!!!!!!!!!!!!!!!!!!!!!!!!!!!!!!!!!!!!!!!!!!!!!!!!!!!!!!!!!!!!!!!!!!!!!!!!!!!!!!!!!!!!!!!!!!!!!!!!!!!!!!!!!!!!!!!!!!!!!!!!!!!!!!!!!!!!!!!!!!!!!!!!!!!!!!!!!!!!!!!!!!!!!!!!!!!!!!!!!!!!!!!!!!!!!!!!!!!!!!!!!!!!!!!!!!!!!!!!!!!!!!!!!!!!!!!!!!!!!!!!!!!!!!!!!!!!!!!!!!!!!!!!!!!!!!!!!!!!!!!!!!!!!!!!!!!!!!!!!!!!!!!!!!!!!!!!!!!!!!!!!!!!!!!!!!!!!!!!!!!!!!!!!!!!!!!!!!!!!!!!!!!!!!!!!!!!!!!!!!!!!!!!!!!!!!!!!!!!!!!!!!!!!!!!!!!!!!!!!!!!!!!!!!!!!!!!!!!!!!!!!!!!!
 File reception completed.
After some time, the turbobooting RSP will reset the TURBOBOOT ROMMON variable, reset the configuration register to 0x2, and indicate an impending reload in 30 seconds. This is demonstrated below.
1
2
3
4
5
6
7
8
9
10
11
Nov 20 22:09:19.759 : TURBOBOOT: Package copy operation is complete.
 Install operation 1 completed successfully at 22:09:19 UTC Mon Nov 20 2017.
 Nov 20 22:09:19.887 : TURBOBOOT: All node preparations complete:
 Node 0/RSP0/CPU0 successfully completed the preparation.
 Node 0/0/CPU0 successfully completed the preparation.

Nov 20 22:09:19.894 : TURBOBOOT: Resetting TURBOBOOT rommon variable to (TURBOBOOT=).
 Nov 20 22:09:21.470 : TURBOBOOT: Setting config-register to autoboot the router and disable send break.
 Nov 20 22:09:21.492 : TURBOBOOT: Turboboot completed successfully: the router will now reload from disk

Nov 20 22:09:21.492 : TURBOBOOT: *** RESETTING IN 30 SECONDS ***
The RSP will then reload, then boot into the desired IOS XR software version. Once the RSP has fully loaded into IOS XR and all other line cards (with the exception of the standby RSP) are in either IOS XR RUN, READY, or OK, the standby RSP must be brought online under the new version as well. This can be done by setting the configuration register to 0x2 in ROMMON, syncing the boot variable changes, and resetting the RSP as shown below.
1
2
3
4
5
6
7
8
 rommon 1 > unset BOOT
 rommon 2 > confreg 0x2

nv_wr_confreg:val=0x2.
 writing 0x2 to confreg.
 You must reset or power cycle for new the new confreg value to take effect
 rommon 3 > sync
 rommon 4 > reset
The standby RSP will synchronize software packages with the active RSP, then boot into the desired IOS XR software version normally.
You can confirm that you have successfully turbobooted the chassis if the show install active summary command reveals that only the mini PIE is active, and if the admin show platform command reveals that all cards are in either IOS XR RUN, READY, or OK status.
1
2
3
4
5
6
7
8
9
10
11
12
13
14
15
16
17
18
19
20
21
22
23
24
25
RP/0/RSP0/CPU0:ios#show install active summary
 Mon Nov 20 23:10:08.378 UTC
 Default Profile:
 SDRs:
 Owner
 Active Packages:
 disk0:asr9k-mini-px-6.0.2

RP/0/RSP0/CPU0:ios#admin show platf
 Mon Nov 20 23:09:31.157 UTC
 Node Type State Config State
 -----------------------------------------------------------------------------
 0/RSP0/CPU0 A9K-RSP440-TR(Active) IOS XR RUN PWR,NSHUT,MON
 0/RSP1/CPU0 A9K-RSP440-TR(Standby) IOS XR RUN PWR,NSHUT,MON
 0/FT0/SP ASR-9006-FAN READY
 0/FT1/SP ASR-9006-FAN READY
 0/0/CPU0 A9K-MOD160-SE IOS XR RUN PWR,NSHUT,MON
 0/0/0 A9K-MPA-8X10GE OK PWR,NSHUT,MON
 0/0/1 A9K-MPA-20X1GE OK PWR,NSHUT,MON
 0/1/CPU0 A9K-VSM-500 UNPOWERED NPWR,NSHUT,MON
 0/3/CPU0 A9K-VSM-500 UNPOWERED NPWR,NSHUT,MON
 0/PS0/M0/SP PWR-3KW-AC-V2 READY PWR,NSHUT,MON
 0/PS0/M1/SP PWR-3KW-AC-V2 READY PWR,NSHUT,MON
 0/PS0/M2/SP PWR-3KW-AC-V2 READY PWR,NSHUT,MON
 0/PS0/M3/SP PWR-3KW-AC-V2 READY PWR,NSHUT,MON
IOS XR Software Upgrade/Downgrade Caveats
- All IOS XR software versions prior to 5.3.1 require the CSCut52232 SMU in order for additional SMUs to be installed. 5.3.1 and later are not affected by this defect and do not require the CSCut52232 SMU. The tar file filename for this SMU on CCO is
asr9k-px-5.1.2.CSCut52232.tar. - In some instances, you may have to manually install the root certificate contained within the CSCut52232 SMU .tar file before installing the CSCut52232 SMU itself.
Conclusion
At this point, an individual who was previously unfamiliar with IOS XR software should be able to change the software version of an IOS XR device. Furthermore, if an IOS XR device is unstable due to software packages, or needs to undergo a drastic upgrade or downgrade, an individual should be able to successfully turboboot an IOS XR chassis.
I hope that you found this helpful or educational!